Posted on Leave a comment

How do I add lyrics to MIDI files?

Adding and storing lyrics in MIDI files is a feature supported by the MIDI standard, allowing lyrics to be embedded directly within the MIDI data. This can be particularly useful for karaoke applications, live performances, or any scenario where the lyrics need to be synchronized with the music. Here’s how lyrics can be added and stored in MIDI files:

1. MIDI Lyric Meta Events

MIDI files can store lyrics using Lyric Meta Events. These events are a part of the MIDI standard and are specifically designed to embed text, such as lyrics, into a MIDI sequence. Each word or syllable of the lyrics is associated with a specific time in the track, allowing them to be displayed in sync with the music.

  • Meta Event Type: The MIDI event type used to store lyrics is the Lyric Meta Event (0x05).
  • Text Data: The actual lyrics are stored as text data within these events.

2. Software for Adding Lyrics

To add lyrics to a MIDI file, you typically use a MIDI sequencing or editing software that supports Lyric Meta Events. Here’s how you can do it:

Using Digital Audio Workstations (DAWs)

Some DAWs and MIDI editing software allow you to add lyrics directly to a MIDI track. Examples include:

  • Cakewalk by BandLab: One of the most popular DAWs for handling MIDI lyrics. You can input lyrics directly into the MIDI track and align them with the corresponding notes.
  • Cubase: Another DAW that allows the addition of lyrics via the MIDI editor.
  • MuseScore: A free notation software that supports adding lyrics to MIDI files.

Steps to Add Lyrics in a DAW

  1. Import or Create a MIDI Track: Start by importing an existing MIDI file or creating a new MIDI sequence in your DAW.
  2. Access the MIDI Editor: Open the MIDI editor in your DAW to view the MIDI events. There should be an option to add or edit lyrics.
  3. Enter Lyrics:
  • In Cakewalk, for example, you would use the Lyric View to input lyrics, aligning each word or syllable with the corresponding note.
  • In MuseScore, you can select the note where the lyric should appear, and then type the word or syllable.
  1. Sync Lyrics with Music: Ensure the lyrics are synchronized with the music. Each word or syllable should be associated with the appropriate note, allowing it to display in time with the music during playback.
  2. Save the MIDI File: Once the lyrics are added and synced, save the MIDI file. The lyrics will now be embedded in the file as Lyric Meta Events.

3. Karaoke MIDI Files

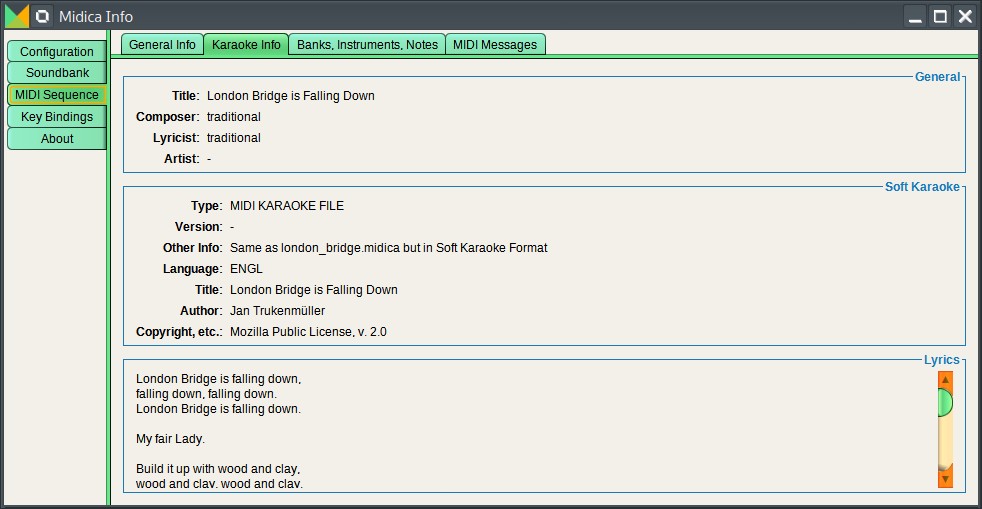
MIDI files with embedded lyrics are often used in karaoke systems. These files are typically referred to as MIDI-Karaoke or KAR files (MIDI files with a .kar extension).

  • KAR Files: These are specialized MIDI files that include lyrics and other metadata designed for karaoke systems. Many karaoke software programs support these files and can display the lyrics on the screen in sync with the music.

4. Playback of MIDI Files with Lyrics

To view and play back the lyrics embedded in a MIDI file, you’ll need a compatible MIDI player or software that can interpret and display the Lyric Meta Events.

  • MIDI Players with Lyric Support: Some MIDI players, such as vanBasco’s Karaoke Player, can display lyrics as the MIDI file plays.
  • DAWs: Many DAWs that support MIDI lyrics can also display them during playback, allowing you to see how the lyrics align with the music.

5. Considerations

  • Encoding: Ensure that the lyrics are encoded in a supported character set, usually ASCII or UTF-8, to avoid issues with special characters.
  • Timing: Precise timing is crucial when syncing lyrics with music. Pay attention to the placement of each Lyric Meta Event to ensure they display correctly.

Conclusion

Lyrics can be added and stored in MIDI files using Lyric Meta Events, making it possible to synchronize text with music for applications like karaoke or live performance. By using MIDI editing software or DAWs that support lyric entry, you can embed the lyrics directly into the MIDI file, ensuring they play back in sync with the corresponding notes. This feature adds another layer of interactivity and functionality to MIDI, making it a versatile tool for music production and performance.

Posted on Leave a comment

Chaining Multiple MIDI Instruments Together

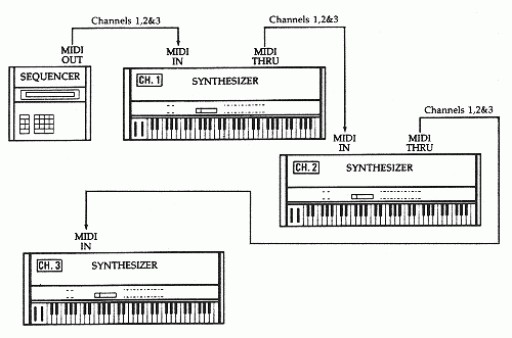
Chaining multiple MIDI instruments together, often referred to as MIDI daisy-chaining, is a technique where multiple MIDI devices are connected in series. This allows a single MIDI controller (such as a keyboard) to send MIDI data to multiple instruments or sound modules. This setup is useful in various scenarios, from live performances to complex studio setups.

How to Chain Multiple MIDI Instruments Together

To chain multiple MIDI instruments together, you will typically use the MIDI Thru port on your devices. Here’s a step-by-step guide on how to do it:

1. Start with the MIDI Controller

  • MIDI Out: The first device in the chain is usually your MIDI controller, such as a keyboard or DAW. Connect a MIDI cable from the MIDI Out port of the controller to the MIDI In port of the first instrument in the chain.

2. Connect the First Instrument

  • MIDI Thru: After connecting the first instrument’s MIDI In port, use another MIDI cable to connect the MIDI Thru port of the first instrument to the MIDI In port of the second instrument.

3. Add More Instruments

  • Repeat the process, connecting the MIDI Thru of one instrument to the MIDI In of the next, until all your instruments are connected.

4. MIDI Channel Assignment

  • Assign each instrument in the chain to a different MIDI channel. This allows the MIDI controller to send specific data to each instrument independently.

Example Setup

  1. MIDI Controller: Connect the MIDI Out to the first instrument.
  2. Instrument 1: Connect MIDI Thru to Instrument 2.
  3. Instrument 2: Connect MIDI Thru to Instrument 3.
  4. Instrument 3: No further connections unless adding more instruments.

Why Chain Multiple MIDI Instruments?

Chaining MIDI instruments together offers several benefits, particularly in live performances and complex studio environments.

1. Expand Your Sound Palette

  • By chaining multiple instruments, you can significantly expand your sound palette. For example, you can have a synthesizer, drum machine, and sound module all responding to different MIDI channels from a single controller. This setup allows you to create richer, more complex soundscapes.

2. Simplify Control

  • MIDI daisy-chaining allows you to control multiple instruments from a single controller, such as a MIDI keyboard. This is especially useful in live performances where you might want to trigger different sounds or instruments without switching controllers.

3. Layered Sounds

  • Chaining MIDI instruments allows you to layer sounds by assigning multiple instruments to the same MIDI channel. For example, you could have a piano, string ensemble, and synth pad all play the same notes simultaneously, creating a fuller, more textured sound.

4. Efficient Use of MIDI Ports

  • In setups with limited MIDI ports (such as on older devices or simpler interfaces), daisy-chaining can help maximize the number of instruments you can connect without requiring additional MIDI interfaces.

5. Complex Arrangements

  • In studio settings, chaining MIDI instruments is useful for creating complex arrangements where different parts of a composition are played by different instruments. This setup allows for more detailed and dynamic compositions.

Potential Challenges

While chaining MIDI instruments together can be highly beneficial, there are a few challenges to be aware of:

  • MIDI Thru Latency: Each device in the chain introduces a slight delay as the MIDI signal passes through. While typically negligible, this can become noticeable if many devices are chained together.
  • Limited MIDI Channels: With only 16 available MIDI channels, a large setup might require careful channel management to avoid conflicts.
  • Signal Degradation: Over long chains, especially with many devices, there might be slight signal degradation. Using MIDI signal boosters or splitters can help if this becomes an issue.

Alternatives to Daisy-Chaining

  • MIDI Splitters: For large or complex setups, using a MIDI splitter allows one MIDI Out signal to be sent directly to multiple MIDI In ports simultaneously, reducing latency and signal degradation.
  • MIDI Interfaces: In a studio environment, using a multi-port MIDI interface can help manage multiple devices more efficiently, providing direct connections from a DAW to each instrument.

Conclusion

Chaining multiple MIDI instruments together is a powerful way to expand your musical setup, allowing for more complex arrangements, layered sounds, and efficient control. Whether you’re performing live or working in a studio, understanding how to daisy-chain MIDI devices can greatly enhance your creative possibilities. While there are some challenges to consider, the benefits of a well-organized MIDI chain can be substantial, offering greater flexibility and control over your music production.

Posted on Leave a comment

Do you sacrifice sound quality by going digital?

The debate between digital and analog music production is a longstanding one, with arguments on both sides regarding sound quality, convenience, and artistic expression. Whether producing digital music sacrifices sound quality compared to analog music depends on several factors, including the context, the listener’s preferences, and the quality of the equipment and processes used. Here’s a breakdown of the key considerations:

1. Sound Quality Differences

  • Analog Sound: Analog recording captures the continuous waveform of sound. Vinyl records and tape recordings are examples of analog formats. Proponents of analog argue that it provides a warmer, richer, and more natural sound, particularly because it captures subtle nuances and harmonics that some believe are lost in digital formats.
  • Digital Sound: Digital music is recorded and stored as binary data (1s and 0s). It involves converting the continuous analog signal into discrete digital data through a process called sampling. The quality of digital sound depends largely on the sample rate (how often the sound is measured) and bit depth (how much information is captured in each measurement). High-resolution digital formats can achieve very high sound quality, often indistinguishable from analog to the average listener.

2. Advantages of Digital Music Production

  • Precision and Flexibility: Digital music production allows for precise editing, manipulation, and processing of sound. Producers can easily cut, copy, paste, and alter audio without degradation in quality, which is difficult with analog.
  • Portability and Accessibility: Digital files are easy to store, share, and distribute. Digital audio can be streamed, downloaded, and played on a wide variety of devices, making music more accessible to listeners worldwide.
  • Consistency: Digital recordings do not degrade over time, unlike analog formats like tape, which can wear out or degrade with repeated playback.
  • Advanced Processing: Digital audio workstations (DAWs) and plugins offer powerful tools for sound design, mixing, and mastering, giving producers a vast array of creative options that are not possible with analog equipment.

3. Perceived Loss of Quality in Digital Music

  • Sampling Limitations: While modern digital recordings can capture audio at very high quality, there is still some loss of information during the analog-to-digital conversion process. For instance, when audio is sampled at 44.1 kHz (the standard for CDs), certain high-frequency details may be lost, though this is often imperceptible to most listeners.
  • Digital Artifacts: Poorly executed digital processing can introduce artifacts such as aliasing, quantization noise, or digital distortion, which can negatively impact sound quality. However, with high-quality equipment and careful processing, these issues can be minimized or eliminated.
  • Psychological Factors: Some listeners perceive digital music as “colder” or “less organic” compared to analog because of the way it is processed. This perception can be subjective and influenced by personal preference or familiarity with analog sound.

4. Hybrid Approaches

Many modern producers use a hybrid approach, combining the best of both analog and digital worlds. For example, a producer might record instruments using analog equipment to capture that warm, rich sound, and then use digital tools for editing, mixing, and mastering. This approach can provide the warmth of analog with the precision and convenience of digital.

5. Listener Experience

Ultimately, whether digital music production sacrifices sound quality is subjective and depends on the listener’s experience, preferences, and the listening environment. In many cases, high-quality digital music can sound virtually indistinguishable from analog, especially with advancements in digital recording and playback technology.

Conclusion

Producing digital music does not necessarily mean sacrificing sound quality. While there are inherent differences between analog and digital sound, each has its strengths. Digital music offers unparalleled flexibility, precision, and convenience, while analog can provide a unique warmth and character. The choice between analog and digital often comes down to the specific needs of the producer, the desired sound, and the preferences of the listener. Many modern music productions successfully combine both analog and digital elements to create the best possible sound.

Posted on 1 Comment

Difference Between MIDI Type 1 and MIDI Type 0

MIDI (Musical Instrument Digital Interface) is a powerful tool in music production, enabling the communication between various electronic instruments, computers, and other devices. One of the most useful features of MIDI is its ability to save performances as Standard MIDI Files (SMF), which can be shared and played back on different devices and software. However, not all MIDI files are created equal. There are different types of MIDI files, with Type 0 and Type 1 being the most common. This article will explore the differences between these two types and why you might choose one over the other.

What is MIDI Type 0?

MIDI Type 0 is the simpler of the two formats. In a Type 0 file, all the MIDI events—such as note-on, note-off, control changes, and program changes—are stored on a single track. This means that even if a performance involves multiple instruments or parts, all the data is combined into one track.

Key Characteristics of MIDI Type 0:

  • Single Track: All MIDI events are merged into one track.
  • Channel-Based Data: Although there is only one track, the data is still organized by MIDI channels. For example, Channel 1 might control the piano part, while Channel 10 might handle the drums.
  • Simple Structure: Type 0 files are straightforward and easy to use, making them compatible with a wide range of devices, including older hardware and simpler software.

When to Use MIDI Type 0:

  • Compatibility: If you’re working with older MIDI devices or software that might not support more complex file structures, Type 0 is often the safest choice.
  • File Size: Type 0 files are generally smaller and simpler, which can be beneficial when storage or processing power is limited.
  • Basic Needs: If your MIDI composition is straightforward and doesn’t require much editing after the fact, Type 0 can be an efficient option.

What is MIDI Type 1?

MIDI Type 1 is more advanced and flexible. In a Type 1 file, MIDI events are organized into multiple tracks. Each track can represent a different instrument or part of the composition, making it easier to manage complex arrangements.

Key Characteristics of MIDI Type 1:

  • Multiple Tracks: MIDI events are stored in separate tracks, each of which can represent a different instrument or part.
  • Greater Flexibility: The multi-track structure allows for more detailed editing, making it easier to work with complex compositions.
  • Enhanced Control: With each instrument or part on its own track, you can easily adjust specific elements without affecting the entire composition.

When to Use MIDI Type 1:

  • Complex Compositions: If your composition involves multiple instruments or layers, Type 1 is ideal. The separate tracks make it easier to manage and edit each part individually.
  • Editing Flexibility: Type 1 is perfect for situations where you need to make changes to specific elements of the composition after it’s been recorded. For example, if you want to tweak just the drum part or adjust the strings’ dynamics, having each part on its own track is invaluable.
  • Professional Production: In a professional music production environment, where precision and control are paramount, Type 1 is generally preferred. It provides the structure needed to handle intricate arrangements.

Why Choose One Over the Other?

The choice between MIDI Type 0 and Type 1 largely depends on your specific needs and the context in which you’re working.

Choose MIDI Type 0 If:

  • You Need Broad Compatibility: Type 0 is widely compatible, making it a good choice when you need to ensure your file can be played on various devices or software.
  • Your Project is Simple: If your composition is not overly complex, Type 0 might be all you need. It’s straightforward and efficient, perfect for simpler projects.

Choose MIDI Type 1 If:

  • Your Composition is Complex: For compositions involving multiple instruments or intricate arrangements, Type 1’s multi-track structure provides the flexibility and control you need.
  • You Plan to Edit: If you anticipate making detailed edits or adjustments after the initial recording, Type 1 is the better choice.
  • You’re Working in a Professional Environment: In professional music production, where quality and precision are critical, Type 1’s structure allows for a higher level of detail and control.

Conclusion

Both MIDI Type 0 and Type 1 have their places in music production. Type 0’s simplicity and broad compatibility make it a good choice for straightforward projects or when working with older equipment. Type 1’s flexibility and multi-track structure, on the other hand, make it ideal for more complex compositions and professional production environments. Understanding the differences between these two types will help you choose the best format for your specific needs, ensuring that your music is both well-structured and easily manageable.

Posted on Leave a comment

What is a MIDI Controller?

The Basics

A MIDI controller is an essential tool in modern music production, allowing musicians to control various software instruments, effects, and other MIDI-compatible devices. Unlike traditional keyboards or synthesizers, MIDI controllers do not produce sound on their own. Instead, they send MIDI data to another device, which then generates the sound. This article will explore what a MIDI controller is, the different types available, and why keyboard MIDI controllers are particularly popular.

Understanding MIDI Controllers

MIDI controllers come in various shapes and sizes, but they all share the same primary function: sending MIDI (Musical Instrument Digital Interface) messages to control other devices or software. These messages can include note-on and note-off commands, velocity (how hard a key or pad is pressed), pitch bends, modulation, and more.

Types of MIDI Controllers

  • Keyboard Controllers: These look like traditional keyboards but don’t produce sound themselves. They are designed to control virtual instruments and other MIDI devices.
  • Pad Controllers: Often used by beatmakers, these controllers feature a grid of velocity-sensitive pads, ideal for triggering drum samples or loops.
  • Knob/Slider Controllers: These controllers offer physical knobs, faders, and buttons to control parameters like volume, pan, or effects in a DAW (Digital Audio Workstation).
  • Wind Controllers: Shaped like wind instruments, these are used by musicians who play wind instruments but want to control MIDI devices with familiar fingerings and breath control.

Focus on Keyboard MIDI Controllers

Keyboard MIDI controllers are among the most popular types, especially for musicians who want a versatile tool that can emulate a wide range of instruments. They resemble traditional keyboards but with a significant difference: they don’t generate sound on their own. Instead, they send MIDI data to a connected device, such as a computer or a sound module, which then produces the sound.

How Do Keyboard MIDI Controllers Work?

Keyboard MIDI controllers work by sending MIDI data when you press a key. This data includes:

  • Note Information: Which note you played (e.g., C4, D#5).
  • Velocity: How hard you pressed the key, affecting the volume and expression of the note.
  • Aftertouch: Some controllers detect additional pressure applied to keys after they are pressed, which can modulate sound parameters like vibrato or volume.
  • Control Change Messages: These can be sent using knobs, sliders, or mod wheels on the controller, allowing you to adjust various parameters in real-time.

    Once this data is sent to a connected device or software, the sound is generated based on the instructions provided by the MIDI messages.

Benefits of Keyboard MIDI Controllers Over Traditional Synthesizers

Versatility: Keyboard MIDI controllers can control a vast array of virtual instruments, synthesizers, and effects. You can switch from playing a grand piano to a synthesizer lead or even control orchestral instruments, all with the same controller.

Portability: Many keyboard MIDI controllers are lightweight and compact, making them easy to transport compared to traditional synthesizers or keyboards, which can be bulky and heavy.

Affordability: Since MIDI controllers do not have built-in sound engines, they are often less expensive than full-fledged synthesizers. This makes them a cost-effective option for musicians who already have a computer or sound module.

Integration with DAWs: Keyboard MIDI controllers often come with features that integrate seamlessly with popular DAWs like Ableton Live, Logic Pro, or FL Studio. This includes pre-mapped controls for easier workflow, such as transport controls, track selection, and more.

Customization: With a MIDI controller, you have the flexibility to customize the sound and performance to suit your needs. You can map any control to any parameter, giving you complete control over your music production environment.

Conclusion

Keyboard MIDI controllers offer a versatile, portable, and cost-effective way to create music with a vast array of virtual instruments and effects. While they lack the built-in sound engines of traditional synthesizers, their ability to control software instruments and integrate seamlessly with DAWs makes them a powerful tool in any musician’s arsenal. Whether you’re composing, performing, or producing, a MIDI controller can enhance your creative process and expand your musical possibilities.

Posted on 1 Comment

Working With Audio and MIDI

Understanding the Difference Between Audio Signals and MIDI Messages in Music

When diving into the world of digital music production, one of the essential distinctions to understand is the difference between audio signals and MIDI messages. Both play crucial roles in creating and manipulating music, but they function in fundamentally different ways.

What are Audio Signals?

Audio signals are continuous waveforms that represent sound. These signals can be analog or digital. Analog audio signals are continuous and vary in amplitude and frequency to represent sound waves. In digital audio, these continuous signals are converted into discrete binary data that can be processed by computers.

Key characteristics of audio signals:

  • Amplitude: Represents the loudness of the sound.
  • Frequency: Represents the pitch of the sound.
  • Waveform: The shape of the wave, which determines the timbre or quality of the sound.

What are MIDI Messages?

MIDI (Musical Instrument Digital Interface) messages, on the other hand, are digital instructions that tell an electronic musical instrument or software what to play. MIDI does not contain actual audio data; instead, it sends information about how music (notes) should be performed.

Key components of MIDI messages:

  • Note On/Off: Indicates when a note should start and stop.
  • Velocity: Represents how hard a key is pressed, affecting the loudness and timbre.
  • Control Change: Adjusts parameters like volume, panning, modulation, and more.
  • Program Change: Switches between different instrument sounds or patches.

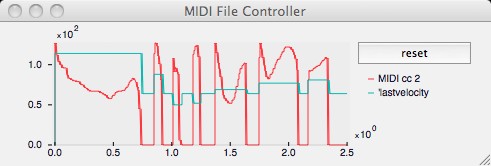
MIDI note message are often represented by a piano roll with notes and velocity bars. Each note is an instruction for a specific pitch, duration, and velocity, rather than an audio waveform.

Practical Example: Using a MIDI Keyboard

To understand how these two concepts work together, let’s consider a musician using a MIDI keyboard connected to a computer.

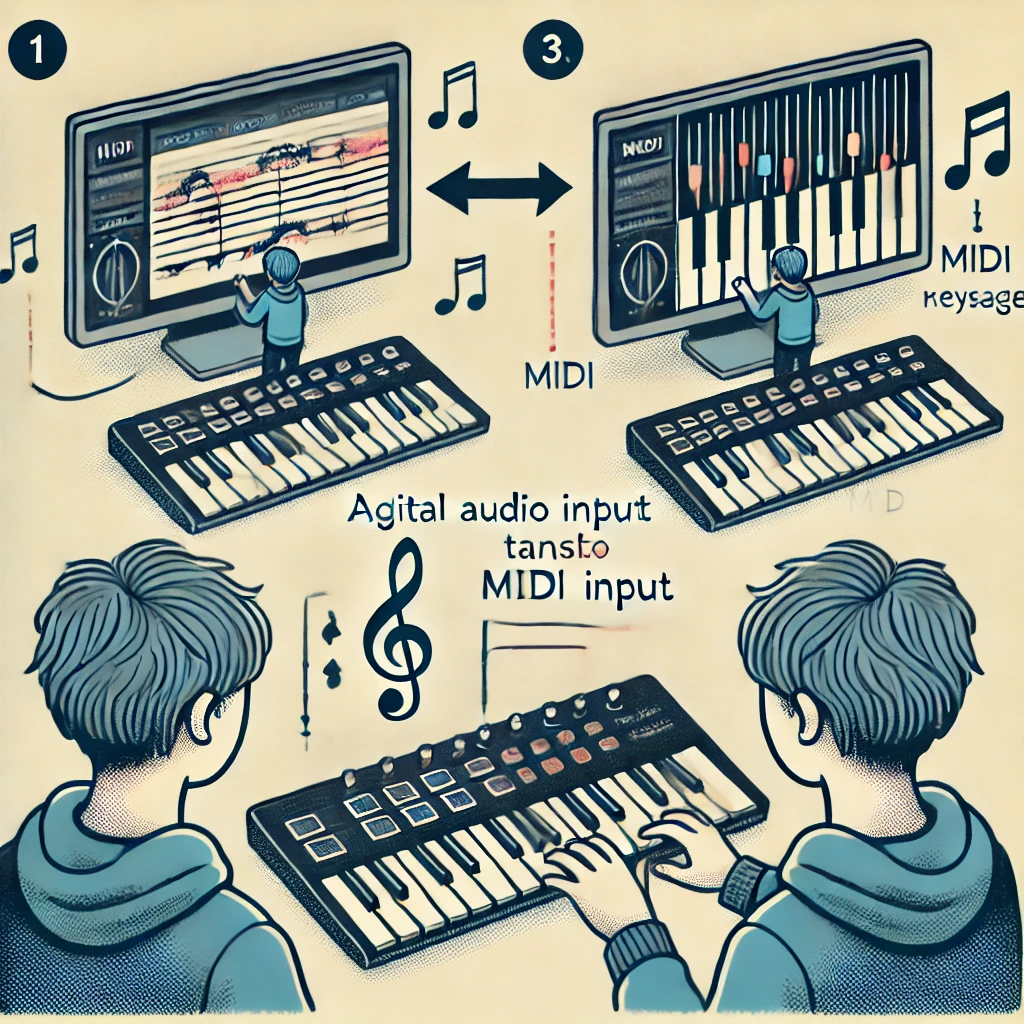
In basic terms, the musician plays a MIDI keyboard, which sends MIDI messages to the computer (or keyboards internal computer). The computer processes these messages in a digital audio workstation (DAW). On the screen, we see both a digital audio waveform and a MIDI piano roll.

  1. MIDI Input: When the musician presses a key, the MIDI keyboard sends a Note On message with the note’s pitch and velocity.
  2. MIDI Processing: The DAW receives these MIDI messages and can use them to trigger virtual instruments or external synthesizers.
  3. Audio Output: The sound generated by these instruments is then converted into an audio signal, which can be recorded as a digital audio waveform.

Why Understanding the Difference Matters

Understanding the difference between audio signals and MIDI messages is vital for several reasons:

  • Editing: MIDI data is highly editable. You can change notes, adjust velocities, and modify control changes without re-recording. This is not as easily done with audio signals.
  • Flexibility: MIDI allows you to use different virtual instruments or synthesizers without changing the original performance. In contrast, audio recordings are tied to the specific sound captured during recording.
  • File Size: MIDI files are much smaller than audio files because they only contain performance instructions, not the actual sound data.

Conclusion

Audio signals and MIDI messages are both integral to modern music production, each serving unique purposes. Audio signals capture the actual sound, while MIDI messages provide detailed instructions on how the music should be performed. By leveraging both, musicians and producers can achieve a high level of creativity and precision in their work. Understanding how to use and manipulate these two types of data is crucial for anyone involved in digital music production.

Posted on Leave a comment

How to Make General MIDI Sound Better

General MIDI (GM) is a standard protocol that allows electronic musical instruments and computers to communicate. While GM is great for ensuring compatibility across different devices, the quality of the sounds produced by many GM sound modules can be lackluster. If you want to enhance the sound quality of your General MIDI compositions, there are several strategies you can employ. Here’s how you can make your General MIDI sound better and improve the overall production value.

Understanding the Limitations

First, it’s important to understand why General MIDI might not sound as good as you’d like:

  • Basic Sound Samples: Many GM sound modules use basic and sometimes outdated sound samples that lack depth and realism.
  • Limited Expression: General MIDI can sometimes limit the expressiveness of the music, making it sound more mechanical.
  • Consistency Over Quality: GM was designed for compatibility, not necessarily for high-quality sound.

Strategies to Improve General MIDI Sound

  1. Upgrade Your Sound Module
    One of the most effective ways to improve your General MIDI sound is to use a higher-quality sound module or virtual instrument (VSTi). There are many software instruments available that provide high-quality samples and advanced synthesis options.

    High-Quality Soundfonts: Look for and use high-quality SoundFont libraries. SoundFonts are collections of sound samples that can replace the default GM sounds with better alternatives.
    Virtual Instruments: Invest in professional virtual instruments (VSTs) that offer superior sound quality and more control over the sound.

  2. Layering Sounds
    Layering sounds is a technique where you combine multiple sounds to create a richer, fuller result.

    Double Up: Use two or more instruments to play the same MIDI part. For example, layer a piano with a subtle pad to add warmth and depth.
    Use Different Octaves: Layer the same instrument in different octaves to create a fuller sound.

  3. Add Effects and Processing
    Applying effects can significantly enhance the sound of General MIDI instruments.

    Reverb and Delay: Adding reverb can make the sound more spacious and natural. Delay can add depth and interest.
    EQ and Compression: Use equalization (EQ) to fine-tune the frequency balance of your sounds. Compression can help control dynamics and add punch.
    Modulation Effects: Effects like chorus, flanger, and phaser can add richness and movement to your sounds.

  4. Use Automation
    Automation allows you to dynamically change parameters over time, adding expressiveness to your MIDI parts.

    Volume and Pan Automation: Vary the volume and stereo placement of your instruments to create a more dynamic mix.
    Effect Automation: Automate effects parameters, such as reverb amount or filter cutoff, to add movement and interest.

  5. Humanize Your MIDI
    General MIDI can sound robotic if every note is played with the same velocity and timing. Humanizing your MIDI can make it sound more natural.

    Velocity Variation: Vary the velocity of notes to mimic the natural dynamics of a live performance.
    Timing Adjustments: Slightly adjust the timing of notes to avoid a perfectly quantized (mechanical) feel.
    Randomization: Many DAWs have a humanize function that can automatically randomize velocities and timings within set parameters.

  6. Enhance with Live Instruments
    Where possible, blend in live recordings of instruments with your MIDI parts. This can add a layer of realism and warmth that purely digital sounds often lack.
    Live Overdubs: Record live instruments playing along with your MIDI tracks.
    Hybrid Approach: Use MIDI to control real hardware synthesizers or samplers and record the audio output.
  7. Mixing and Mastering
    A good mix and master can transform your MIDI tracks into polished, professional-sounding productions.
    Balance: Ensure that each instrument sits well in the mix and that no single part overpowers the others.
    Stereo Imaging: Use panning to place instruments in the stereo field, creating a sense of space.
    Final Touches: Apply mastering techniques to enhance the overall sound, including multi-band compression, limiting, and final EQ adjustments.

Improving the sound of General MIDI involves a combination of better sound sources, creative layering, effective use of effects, and careful mixing. By upgrading your sound module, humanizing your MIDI, and applying professional mixing techniques, you can significantly enhance the production value of your music. Remember, the goal is to make your music sound as expressive and dynamic as possible, bridging the gap between the limitations of General MIDI and the high-quality sound you desire.